Showing posts with label Crafts. Show all posts

Friday, January 18, 2013

all the pretty colors.


When my sister and I were wee little things, we went to a preschool that used the Montessori method of teaching. It is basically a teaching style that combines the use of fine motor skills and organizational exercises to produce children that are militant like in their need for order.

Activities that included things like using an eye-dropper to place a single drop of water on each little suction cup on the underside of one of those soap holder thingy-s (you know, the kind with millions of itty-bitty suctions). My sister and I still joke about the ways that our personalities were shaped by the education of our formative years...and how we each have residual effects (mostly good, hehe) of those painstaking little exercises...

So, naturally, I was delighted when she gave Hunter a "Montessori style" gift this year for his birthday. A box full of simple, inexpensive educational activities to help him become just like his momma (basically an organizational freak=).

Tomorrow, Hunter's buddy Declan is celebrating his first birthday, so I decided to make him a set of these wonderful little educational toys! Everything you need to make these treasures can be found at your local dollar store, and the entire gift can be made in under $8!!


To make your own little box of goodness you need to purchase the following:
A Plastic Shoebox
A bag of decorative rocks
A package of pom-poms
A package of balloons
Play-dough
Ice trays
Colorful little bins


The first activity I labeled "Moving and Sorting"with instructions, "Mix all the pom-poms together and then sort them back out, each to their own basket." These adorable little containers came in a four pack, so all I had to do was empty my pom-pom package and pick out the right colors.


The tag on this one states, "One at a time...take them all out and put them each back, or move from one tray to the other". I think this one is pretty self explanatory:)


This last activity, labeled, "Soft and Hard, Heavy and Light", helps kiddos to recognize the difference in how things feel when held and compared. The two red balloons are stuffed with the decorative rocks (heavy & hard), while the orange ones are stuffed with more pom-poms (soft & light), and the blue ones are filled with play dough (heavy but soft).

I put them all inside the box with their proper labels and wrapped them up for the party tomorrow=) now Hunter and his buddy will be the most organized little men around!

(Thanks Nicole for this awesome gift and idea...you know me so well;)

Tuesday, January 8, 2013

From one hometown to another...

Hi Friends!
Just wanted to share a very simple project that I did this past month. My sister and I decided to only exchange gifts for our kiddos this year for Christmas...but her birthday is the day after Christmas, and I wanted to make a little something special to celebrate. When I saw these personalized mugs months ago on a friends blog, I knew immediately that they were the perfect gift. Because my sister and her hubby live in VA and we live here in PA, they perfectly describe our relationship...a heart for her hometown, and a heart for mine=) (and the dotted lines made us giggle, because the trip down to her house usually results in some wrong turns and wandering, hehe)


I was so happy with the result, and they were so easy. I used a porcelain pen from the craft store, but any sharpie will do! You draw your design on oven-safe mugs, crank up your oven to 350 degrees, and bake for 30 minutes... that's it!

If you would rather have someone else do the dirty work...you can purchase your own set on Etsy at GreySkiesBlue, and if you are looking for really ornate personalized porcelain, check out my friend Caitlin's new shop, Caite'sPlates...she works wonders with a sharpie!

I may or may not have made my hubby and I a set of mugs the other day as well;)


P.S. Sharing this little project over at Thrifty Decor Chick and Tip Me Tuesday=)

Tuesday, June 26, 2012

Apples and Cupcakes...


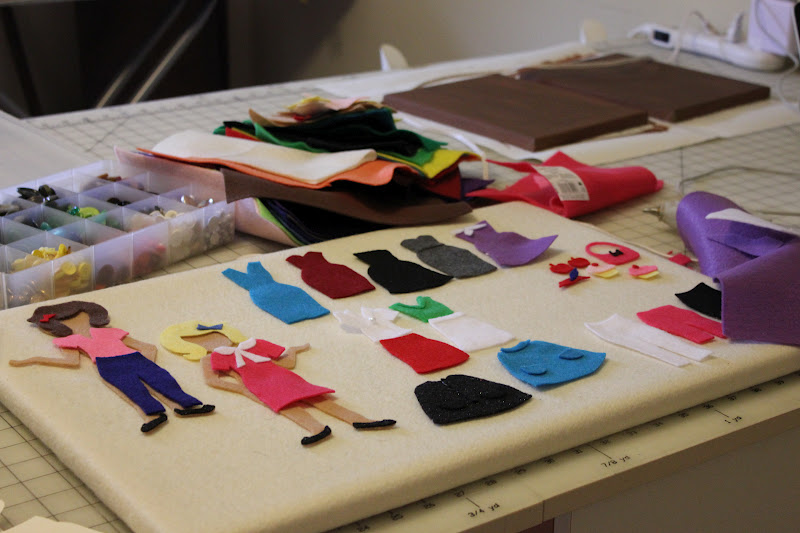
Hey Everyone...I hope Tuesday is being good to you all! I wanted to put up a few pictures of a handmade gift that I gave to my sister for her little lady due in August. When I saw this idea on pinterest a few months ago, I knew it would be perfect for my sister who has a whole room in her house dedicated to her wardrobe and accessories=) Actually, her boudoir as she calls it is becoming a nursery next week..haha.

Anyway, I made this sweet little felt board and a blondie and brunette for my neice to dress up, and lots of little dresses and outfits to mix and match...as well as two of my favorite foods... cupcakes and apples...


I used a template found here to give me the basic girl outline and some of the clothes, and I simply covered a bulliten board with a doubled up peice of felt, hot glued to hold it in place ...then covered the seams on the back with masking tape to give it a finished look. 

It was a really simple project that will hopefully provide my sister's little one with hours of dressing delight;) I also gave her a small stack of felt scraps so she could add peices of clothing to the wardrobe if needed, and so she could enjoy a little craft with her baby girl when she is a little older.

Sharing with:

Monday, June 25, 2012

Welcome to the Carnival!


Hi Friends! I hope everyone had a wonderful weekend! I am back with lots of pictures and details from my sisters baby shower brunch on Saturday! We had a wonderful time, and Nicole (the mom-to-be) was able to catch up with so many familiar faces that she rarely gets to see since moving to Virginia, which was a blessing!


The theme was girly carnival, which we chose after scouring pinterest and magazines for inspiration, as well as doing some brainstorming with friends. I was so excited to make some of the decor myself, and find amazing deals on some of the other elements of the shower.


We used a bed canopy to make the "seat of honor" extra special, and I made the pink and mint banners using doilies from the dollar bins at the craft store!


A dear friend lent us her "Lemonade" sign, and I attached a few little birdies to the corner to make it feel like an authentic outdoor carnival...


We had mounds of cotton candy, sweets, and popcorn, and some cake pops that I made using my new babycakes cakepop maker... and so many sweet friends and family members made yummy quiches, stratas, muffins, and salads...


I found a giant roll of pink raffle tickets at the party store, which turned out to be the perfect addition to the decor, and I was able to use them in a myriad of ways!

Using an idea that I found in Country Living magazine, I spray painted a handful of plastic dollar store animals white, giving them a whimsical, but more classic look. I also found these awesome little lion and elephant piggy banks at the dollar store, which I stuffed with some tickets. 

The little Ferris wheel picture holder below was also an amazing deal...I found two of them for 2.99, and spray painted them white before my mom printed off verses about children to place inside...


We played a simple game where everyone took a ticket and Nicole picked matching coupons from a cup...whoever's color and ticket number she called out had to tell the group how they knew Nicole, and a piece of momma advice! We also asked on the invitation for everyone to bring a favorite children's book to add to Baby's new library collection.


It was a really wonderful time and I am so thankful for each woman who came. Thanks to everyone who made tasty things, wrapped sweet gifts, and smiled brightly at the new-mom-to-be! You all are wonderful blessings to our family!


 Sharing with:

Naptime Delights


Saturday, June 9, 2012

Life in the living room.

It is a gorgeous Saturday morning here in Pa, and I have the excitement of a busy day ahead of me=) I just wanted to quickly post a little project I completed this week...

I was asked to make a bulletin board for the women's ministry at our church... a place where women could post letters and cards to one another, sharing prayer requests and encouragement. We decided to hang the board in the Ladies Room at church (don't laugh) because of all the rooms in our church building, it is the one most frequented on Sunday mornings, hehe.

Anyway, I wanted it to be different than just the standard bulletin, but also did not want to spend alot on this project, so with a canvas drop cloth, some twine, a staple gun and these adorable mini clothespins from walmart, I created this:


I love the idea of having verses and cards that are interchangeable...which got me thinking that I would love my own little "clothesline" for my living room as a fun way to hang our family pictures! Because Hunter is constantly growing and changing, it is the perfect way to have an ever-evolving display of our little guy.


I also grabbed this vintage globe out of my mom's storage this past week. It has been in my family for a few generations now, and I have many memories of my mom using it to point out different countries and oceans when I was a little girl. It's pretty sweet, right???


I love having it set up where I see it everyday because it keeps me mindful of the people and places outside of my little world that I should be thinking about and praying for. AND my whole family has been jet setting off to various countries this year, while Hunter and I hold down the fort here at home. My sister and her husband just returned from the Dominican Republic, my mom arrived home from Paupa New Guinea a few days ago, and my dad and Hubby are headed to Argentina in a few short weeks! Where are Hunter, Sadie, and I going you might ask? For a walk around the block of course=)

In all honesty, I am thrilled for each of them and the adventures that this year has held, and Mike's side of our family has been keeping me company here at home, which is a blessing...(thanks guys!)

How about you? Have any wild adventures planned for your summer? or maybe just a day trip to the beach? Hope you have a fabulous Saturday whatever your plans are!


P.S. Are you thinking that my little wall collection looks a little bare? Me too! I have a sweet and simple DIY father's day present for Mike that I am planning on adding to the bare spots in the photos above, come back in a few days to see it:)