Sunday, July 31, 2011

Tutorial for fabric flowers!

So my sister asked where the tutorials are for the flowers I wrote about...uh...good question...

haha...

The primary tutorial I used is from this adorable blog: www.simplyvintagegirl.com

Even though this is the one I used, there are literally thousands of pictures and tutorials out there for craftaholics like me, I just start with a simple google image search and then let the fun begin!

Hope everyone has a fabulous night!

Friday, July 29, 2011

Coffee and fabric flowers...

Sitting down to write this post feels alot like sitting down to coffee with an old friend who I haven't seen in a while...

only the old friend is my mac book, and the coffee is actually a glass of ice water... hehe...

but you get the idea:)

Mike and I were away this week on a relaxing vacation to Myrtle Beach with our family, and I wish I could say that my mac was sitting at home all week awaiting my return...but the truth is that it was with me the whole time and I ignored it. ignored my blog. and everyone else's. ha. there. the truth is out.

I also ignored all my voicemails and emails. guilty I'm afraid...

and yet I feel total peace about it...because I had a wonderful time with my hubby and my in-laws, drank a few odoules, ate waaay too many milk duds, and didn't think twice about all my cell phone or computer the whole week.

It was fabulous=)

I have the rest of my life to blog. or check my emails. or return phone calls. 

But right now I am 26 weeks pregnant (can you believe it!!) and embracing the fact that my sanity is contingent on me slowing things down a bit and not feeling guilty about the things that don't get done everyday. ahhhh... the joy that comes when you let yourself off the hook a little;)

Anyway, back to what I really wanted to blog about, and that is fabric flowers. I love them.

Anyone else with me?

I have found a new crafting obsession, at least for the next week or two;)

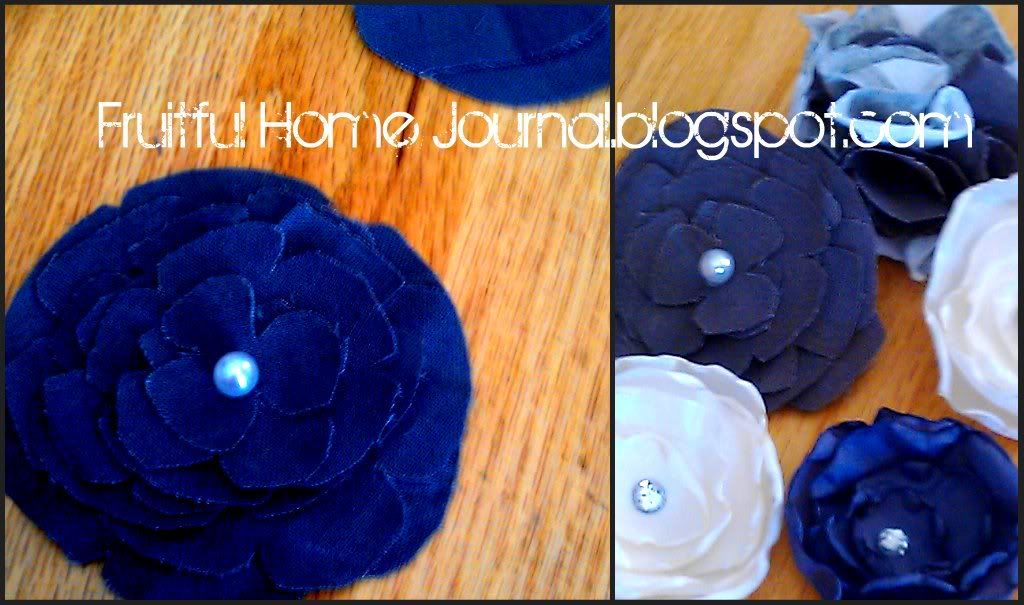
Last week I went online and found some of the most fabulous tutorials and pictures on how to create little fabric beauties...and then I went to work creating my own miniature masterpieces.

Then my dear friend Bek came over for lunch with her sister Liz, and I roped them into the chaos=)

Here are our creations:


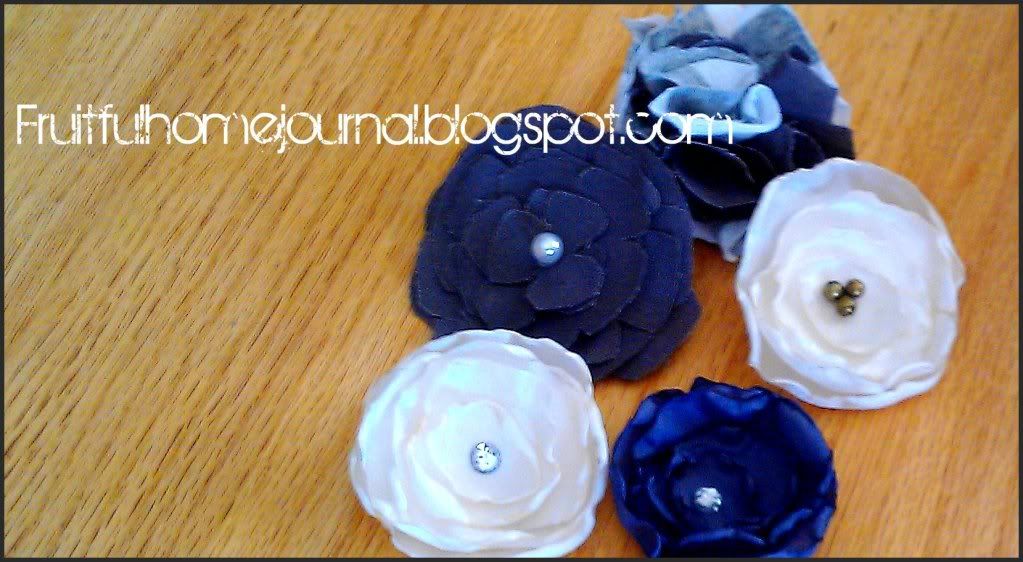
We added little clip and pin backings to them that I picked up from the jewelry making department at Joanne Fabrics...making them the perfect addition to a little summer dress or cardigan... or winter scarf or bag...or really anything...


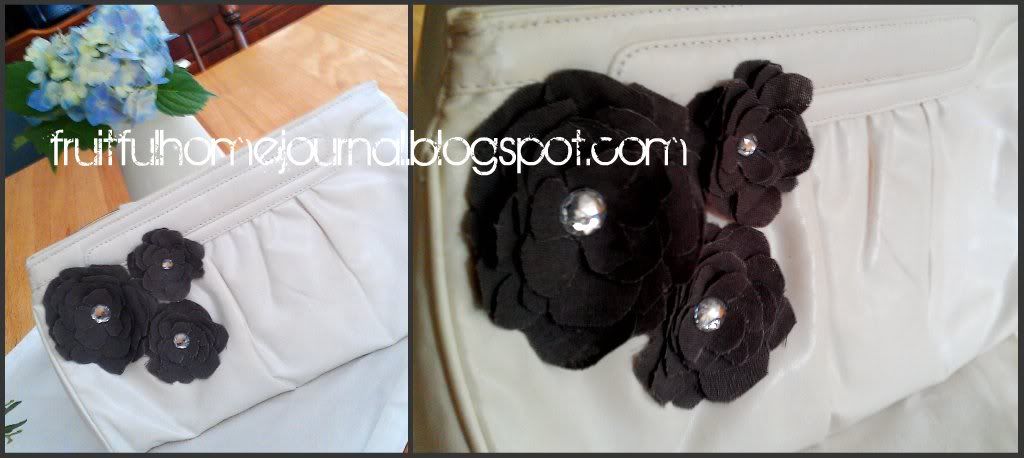
I made three coordinating flowers out of the gray fabric that I found in the remnants bin at Joannes, and then glued them to this little white clutch that I found a few weeks ago while thrifting with my buddy Kirsten...the clutch was only 50 cents and now look at it =)


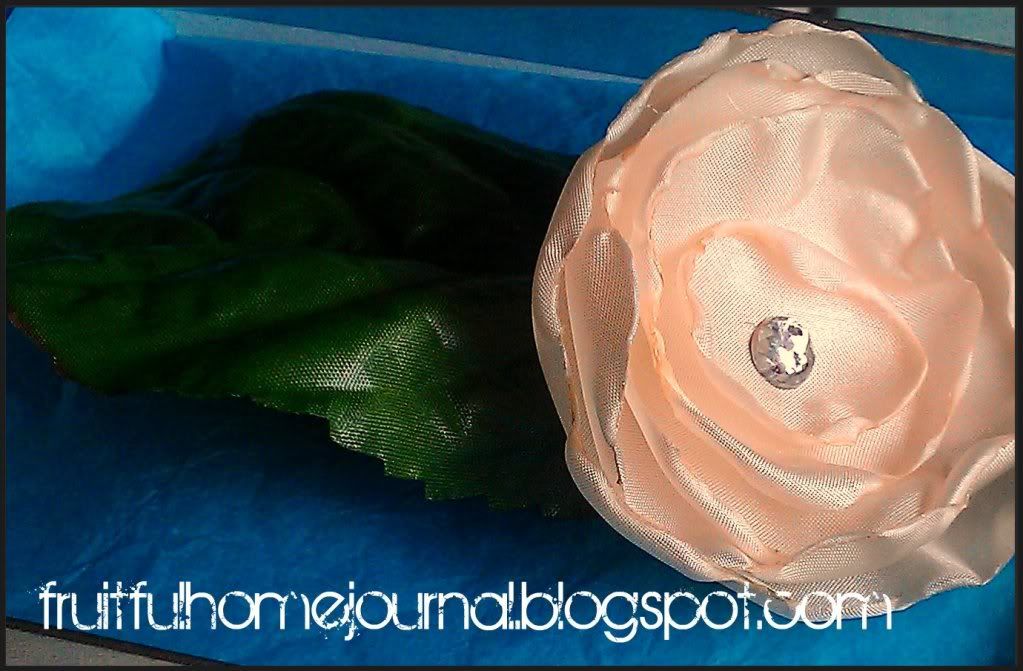
Then, I took one of my silk flower pins and attached it to a little silk petal that I had in my stash of faux flowers and foliage (which I use to garnish wrapped presents;), and then placed it a jewelry box to give it as a gift to my sister who was in from out of town:)

Martha Stewart would be proud.


and the obsession continues...

because I still have a box of fabric remnants calling my name, and about 482 people who I want to make one of these little beauties for...

So until next time, happy fabric flower making everyone!

Thursday, July 21, 2011

Room Transformation!

Hey Everyone!

The last week or so I have taken a little impromptu blog hiatus, which was extended furthermore by the summer cold that attacked me yesterday and had me in bed for hours and hours at a time...not fun;(

But I am back! and want to show you all a little transformation that took place last week in the home of one of my client's from Sweet Tree Designs.

We spent the day clearing out the clutter and organizing her son's room, which was overflowing with all kinds of odds and ends! We hauled a pile off to the dumpster and another pile off to goodwill, and then organized the remaining contents of his room... here are the before and after pictures...

BEFORE: The desk area is unrecognizable under all the clutter!


AFTER: Now the little man who inhabits this space can sit down and work on projects, play on the computer, and do his homework in style!


BEFORE: Underneath, on-top and all around this bunk bed there was clutter galore...


AFTER: Not a single item remains under or on the bed!


BEFORE: A cluttered dresser made it nearly impossible to get ready in the morning...


AFTER: ::happy sigh:: the top of the dresser, along with his boy-ish accessories are visible again!


There you have it! Another room clean and many more to tackle!

Hope everyone is having a great Wednesday and is staying cool!


Monday, July 11, 2011

Bathroom Makeover!

Since I am slowly but surely getting pictures posted of our home, I thought I would take a few minutes and show you our upstairs bathroom, which we renovated on a snowy day this past winter.

Here are the only two before pictures that we have...

You cannot fully appreciate in the picture, just how yucky old tile was, and how vibrant the blue walls were...


We really were fortunate that the previous owner put in a nice white bath-fitter shower/tub as well as a new pedestal sink, and the toilet was still in decent condition, so they stayed...

We did, however, tear out the old tile, hang bead-board and molding, repaint the walls, trim, and ceiling, and replace all the fixtures and hardware with brushed nickle fixtures.

Here is the result!


Hope everyone is having a great day!

Linking up to:
beforeAndAfterButton

Sunday, July 10, 2011

One Year Ago...

Exactly one year ago today I married the man of my dreams=)


It has been the most amazing year of my life, and has left me with so much excitement and anticipation for what this next year will hold...

ok...and now I am speechless, because I don't really know what else to say with words to sum up how blessed I feel and how happy I am...
 so I guess I will just leave it at that;)

...don't forget to tell your spouse how much you love them today!

Thursday, July 7, 2011

Coastal Coasters...

In addition to bringing home Tom and Pep yesterday, I found a little inspiration at the Christmas Tree Shoppes that I wanted to try and make myself...

Sisal drink coasters.


So simple, so easy, and so cute!


I had lots of cork leftover from another project, and I picked up a giant role of sisal from Lowe's for about $7.


I started by tracing the bottom of a glass jar with a sharpie, to get my basic shape...not to worry about the black lines they get covered! Then I cut out eight circles, and began to glue (using a hot glue gun)!


I first glued one piece of sisal around the whole edge, to hide any imperfections and have a foundation for the rest of the sisal.

Then I took another piece and wrapped it around the top, gluing about an inch or two at a time...

I didn't take pictures of the whole gluing process, but let me tell you, it was so easy!

And less than an hour later, this is what my set of eight looked like!


I love them!! and they are so nice and neutral that they could be used in just about any room in our home...or on our new patio!


Cute huh? I was so happy with them!

I thought they also might be a cute, inexpensive houswarming gift to make for a friend, so I bundled them up like they were a gift, just to see  how they would look...


Hope everyone is having a fabulous Thursday!


Here are some Parties I am linking up to, check them out for more great ideas!:
p.s. Does anyone know how to make these links tiny-er and in a neat little row?

Transformation Thursday


A Crafty Soiree


ThriftyThurs Thrifty Thursday Week 31

Wednesday, July 6, 2011

Discount Tom & Pep!

So today I gave in to the urge within me and I took a trip to a wonderful place known as:


This place is fabulous...they have the most expansive collection of items for entertaining at the most incredible prices...

and although I was really just there for window shopping, and idea gathering...

I did fall in love with a little couple that I had to bring home with me=) 

Allow me to introduce you to discount Tom & Pep:


These little one's were on summer clearance for 50 cents a piece, how could I leave them behind?

So home they came, where I promptly saturated their soil, aerated it with a fork, and planted my little seeds=)

I cannot wait to see what these little buggers will do! 


Now, I know what you are thinking...those little grow kits are for toddlers who have a fascination with neon plastic tubs full of "easy-grow" ingredients...hehe...

but let me tell you, when your backyard looks like a construction site, and gardening is not in the budget until next summer,  it is so refreshing to plant a little something, even if it is in a little neon tub!!

So I will nourish discount Tom and discount Pep, and keep you all informed as to their progress:)

Wish them well!

Have a great night!


Linking up to:


Dragonfly Designs


http://www.thethriftyhome.com